![]()
Get Mar-2026 Download Latest & Valid Questions For Linux Foundation CKA exam
Ensure Success With Updated Verified CKA Exam Dumps
Linux Foundation Certified Kubernetes Administrator (CKA) Program Certification Exam is designed for individuals who want to demonstrate their expertise in managing, deploying, and maintaining Kubernetes clusters. Kubernetes is an open-source container orchestration platform that is used by companies of all sizes to manage their containerized workloads. With the increasing popularity of Kubernetes, there is a growing demand for certified professionals who can manage and administer Kubernetes clusters effectively. The CKA exam is a professional certification that validates an individual's skills and knowledge in Kubernetes administration.
NEW QUESTION # 38
Create a pod with init container which waits for a service called "myservice" to be created. Once init container completes, the myapp-container should start and print a message "The app is running" and sleep for 3600 seconds.
- A. vim multi-container-pod.yaml
apiVersion: v1
kind: Pod
metadata:
name: myapp-pod
labels:
app: myapp
spec:
containers:
- name: myapp-container
image: busybox:1.28
command: ['sh', '-c', 'echo The app is running! && sleep
3600']
initContainers:
- name: init-myservice
image: busybox:1.28
command: ['sh', '-c', "until nslookup myservice.$(cat
/var/run/secrets/kubernetes.io/serviceaccount/namespace).s
vc.cluster.local; do echo waiting for myservice; sleep 2;
done"]
// Check whether service called "myservice" exists
kubectl get svc
Note: Pod will not start if service called "myservice" doesn't
exist.
// Now, Create the pod
kubectl apply -f multi-container-pod.yaml - B. vim multi-container-pod.yaml
apiVersion: v1
kind: Pod
metadata:
name: myapp-pod
labels:
app: myapp
spec:
containers:
- name: myapp-container
image: busybox:1.28
command: ['sh', '-c', 'echo The app is running! && sleep
3600']
initContainers:
- name: init-myservice
done"]
// Check whether service called "myservice" exists
kubectl get svc
Note: Pod will not start if service called "myservice" doesn't
exist.
// Now, Create the pod
kubectl apply -f multi-container-pod.yaml
Answer: A
NEW QUESTION # 39
You must connect to the correct host.
Failure to do so may result in a zero score.
[candidate@base] $ ssh Cka000022
Task
Reconfigure the existing Deployment front-end in namespace spline-reticulator to expose port 80/tcp of the existing container nginx .
Create a new Service named front-end-svc exposing the container port 80/tcp .
Configure the new Service to also expose the individual Pods via a NodePort .
Answer:
Explanation:
Task Summary
* SSH into cka000022 #
* Modify an existing Deployment:
* Namespace: spline-reticulator
* Deployment: front-end
* Container: nginx
* Expose: port 80/tcp
* Create a Service:
* Name: front-end-svc
* Type: NodePort
* Port: 80 # container port 80
# Step-by-Step Solution
1## SSH into the correct node
ssh cka000022
## Skipping this = zero score
2## Edit the Deployment to expose port 80
kubectl edit deployment front-end -n spline-reticulator
Under containers: # nginx, add this if not present:
ports:
- containerPort: 80
protocol: TCP
# This enables the container to accept traffic on port 80.
3## Create a NodePort Service
Create a file named front-end-svc.yaml:
cat <<EOF > front-end-svc.yaml
apiVersion: v1
kind: Service
metadata:
name: front-end-svc
namespace: spline-reticulator
spec:
type: NodePort
selector:
app: front-end
ports:
- port: 80
targetPort: 80
protocol: TCP
EOF
## Make sure the Deployment has a matching label selector like app: front-end. You can verify with:
kubectl get deployment front-end -n spline-reticulator -o yaml | grep labels -A 2
4## Apply the service
kubectl apply -f front-end-svc.yaml
5## Verify
Check if the service is created and has a NodePort assigned:
kubectl get svc front-end-svc -n spline-reticulator
# You should see something like:
NAME TYPE CLUSTER-IP EXTERNAL-IP PORT(S) AGE
front-end-svc NodePort 10.96.0.123 <none> 80:3XXXX/TCP 10s
Where 3XXXX is your automatically assigned NodePort (between 30000-32767).
Final Command Summary
ssh cka000022
kubectl edit deployment front-end -n spline-reticulator
# Add:
# ports:
# - containerPort: 80
cat <<EOF > front-end-svc.yaml
apiVersion: v1
kind: Service
metadata:
name: front-end-svc
namespace: spline-reticulator
spec:
type: NodePort
selector:
app: front-end
ports:
- port: 80
targetPort: 80
protocol: TCP
EOF
kubectl apply -f front-end-svc.yaml
kubectl get svc front-end-svc -n spline-reticulator
NEW QUESTION # 40
You are running a critical application on Kubernetes that requires high availability. To ensure the application stays operational even if one or more nodes experience failures, you decide to implement a pod anti-affinity rule. Explain how you can configure an anti-affinity rule to prevent pods from being scheduled on the same node.
Answer:
Explanation:
See the solution below with Step by Step Explanation.
Explanation:
Solution (Step by Step) :
1 . Define the Anti-Affinity Rule: Add an 'affinity' section to the 'spec.template.spec' of your Deployment or StatefulSet. Within , define a podAntiAffinity' section, specifying that pods with the same label should not be placed on the same node.
2. Use 'requiredDuringSchedulinglgnoredDuringExecution': The 'requiredDuringSchedulinglgnoredDuringExecutioru section ensures that the rule is enforced during pod scheduling. Once a pod is scheduled, the rule is ignored. This ensures that even if a node fails, the remaining pods are not affected. 3. Set 'topologyKey': The 'topologyKey' is set to 'kubernetes.io/hostname'. This tells Kubernetes to consider the node's hostname for pod placement. It will prevent pods with the label 'app: my-critical-app' from being scheduled on the same node. 4. Verify the Deployment: Apply the YAML file to your cluster using 'kubectl apply -f my-critical-app.yaml'. You can then check the status of your Deployment using 'kubectl get pods -l app=my-critical-app' to verify that the pods are distributed across different nodes.
NEW QUESTION # 41
You are tasked with setting up fine-grained access control for a Kubernetes cluster running a microservices application. You need to ensure that developers can only access the resources related to their specific microservices while preventing them from accessing or modifying other services' resources. Define RBAC roles and permissions to achieve this, including details of the resources, verbs, and namespaces involved. Consider the following:
Answer:
Explanation:
See the solution below with Step by Step Explanation.
Explanation:
Specify the YAML configurations for roles, role bindings, and service accounts to enable the required access control, ensuring developers only have access to their respective microservice's resources within their assigned namespaces. Solution (Step by Step) : 1. Define Roles:
2. Create Service Accounts: apiVersion: vl kind: ServiceAccount metadata: name: order-service-sa namespace: order-service-ns -- apiVersion: vl kind: ServiceAccount metadata: name: payment-service-sa namespace: payment-service-ns -- apiVersion: vl kind: ServiceAccount metadata: name: inventory-service-sa namespace: inventory-service-ns 3. Bind Roles to Service Accounts: -- apiVersion: rbac.authorization.k8s.io/v1 kind: RoleBinding metadata: name: order-service-dev-binding namespace: order-service-ns roleRef: apiGroup: rbac.authorization.k8s.io kind: Role name: order-service-dev subjects: - kind: ServiceAccount name: order-service-sa namespace: order-service-ns -- apiVersion: rbac.authorization.k8s.io/v1 kind: RoleBinding metadata: name: payment-service-dev-binding namespace: payment-service-ns roleRef: apiGroup: rbac.authorization.k8s.io kind: Role name: payment-service-dev subjects: - kind: ServiceAccount name: payment-service-sa namespace: payment-service-ns -- apiVersion: rbac.authorization.k8s.io/v1 kind: RoleBinding metadata: name: inventory-service-dev-binding namespace: inventory-service-ns roleRef: apiGroup: rbac.authorization.k8s.io kind: Role name: inventory-service-dev subjects: - kind: ServiceAccount name: inventory-service-sa namespace: inventory-service-ns 4. Assign Service Accounts to Users: This step requires external authentication mechanisms like OIDC or LDAP. Assuming you have these mechanisms set up, you can associate the service accounts with specific users ('[email protected]' , '[email protected]', and '[email protected]') using the configured authentication provider. Roles: Define the specific permissions for each microservice developer within their respective namespaces. The roles allow developers to access resources like Pods, Deployments, Services, ConfigMaps, and Secrets related to their assigned microservice. Service Accounts: Service accounts are created in each namespace for each microservice, representing the identity of the developer group. Role Bindings: Role bindings connect the defined roles with the service accounts, granting the associated permissions. User Association: This step connects the service accounts with individual developers through external authentication mechanisms, enabling them to utilize the assigned permissions. By following these steps, you ensure that developers can only access and manage resources associated with their respective microservices within their assigned namespaces. This fine-grained access control policy effectively restricts access and prevents developers from interfering with other microservices or resources. ,
NEW QUESTION # 42
Score: 7%
Task
Create a new NetworkPolicy named allow-port-from-namespace in the existing namespace echo. Ensure that the new NetworkPolicy allows Pods in namespace my-app to connect to port 9000 of Pods in namespace echo.
Further ensure that the new NetworkPolicy:
* does not allow access to Pods, which don't listen on port 9000
* does not allow access from Pods, which are not in namespace my-app
Answer:
Explanation:
See the solution below.
Explanation
Solution:
#network.yaml
apiVersion: networking.k8s.io/v1
kind: NetworkPolicy
metadata:
name: allow-port-from-namespace
namespace: internal
spec:
podSelector:
matchLabels: {
}
policyTypes:
- Ingress
ingress:
- from:
- podSelector: {
}
ports:
- protocol: TCP
port: 8080
#spec.podSelector namespace pod
kubectl create -f network.yaml
NEW QUESTION # 43
Score: 13%
Task
A Kubernetes worker node, named wk8s-node-0 is in state NotReady. Investigate why this is the case, and perform any appropriate steps to bring the node to a Ready state, ensuring that any changes are made permanent.
Answer:
Explanation:
See the solution below.
Explanation
Solution:
sudo -i
systemctl status kubelet
systemctl start kubelet
systemctl enable kubelet
NEW QUESTION # 44
Create a redis pod, and have it use a non-persistent storage
Note: In exam, you will have access to kubernetes.io site,
Refer : https://kubernetes.io/docs/tasks/configure-pod-container/configurevolume-storage/
- A. apiVersion: v1
kind: Pod
metadata:
name: redis
spec:
containers:
- name: redis
image: redis
volumeMounts:
- name: redis-storage
mountPath: /data/redis
ports:
- containerPort: 6379
volumes:
- name: redis-storage
emptyDir: {} - B. apiVersion: v1
kind: Pod
metadata:
name: redis
spec:
containers:
- name: redis
image: redis
volumeMounts:
- containerPort: 6379
volumes:
- name: redis-storage
emptyDir: {}
Answer: A
NEW QUESTION # 45
Create a deployment spec file that will:
Launch 7 replicas of the nginx Image with the labelapp_runtime_stage=dev deployment name: kual00201 Save a copy of this spec file to /opt/KUAL00201/spec_deployment.yaml (or /opt/KUAL00201/spec_deployment.json).
When you are done, clean up (delete) any new Kubernetes API object that you produced during this task.
Answer:
Explanation:
See the solution below.
Explanation
solution
F:\Work\Data Entry Work\Data Entry\20200827\CKA\10 B.JPG
F:\Work\Data Entry Work\Data Entry\20200827\CKA\10 C.JPG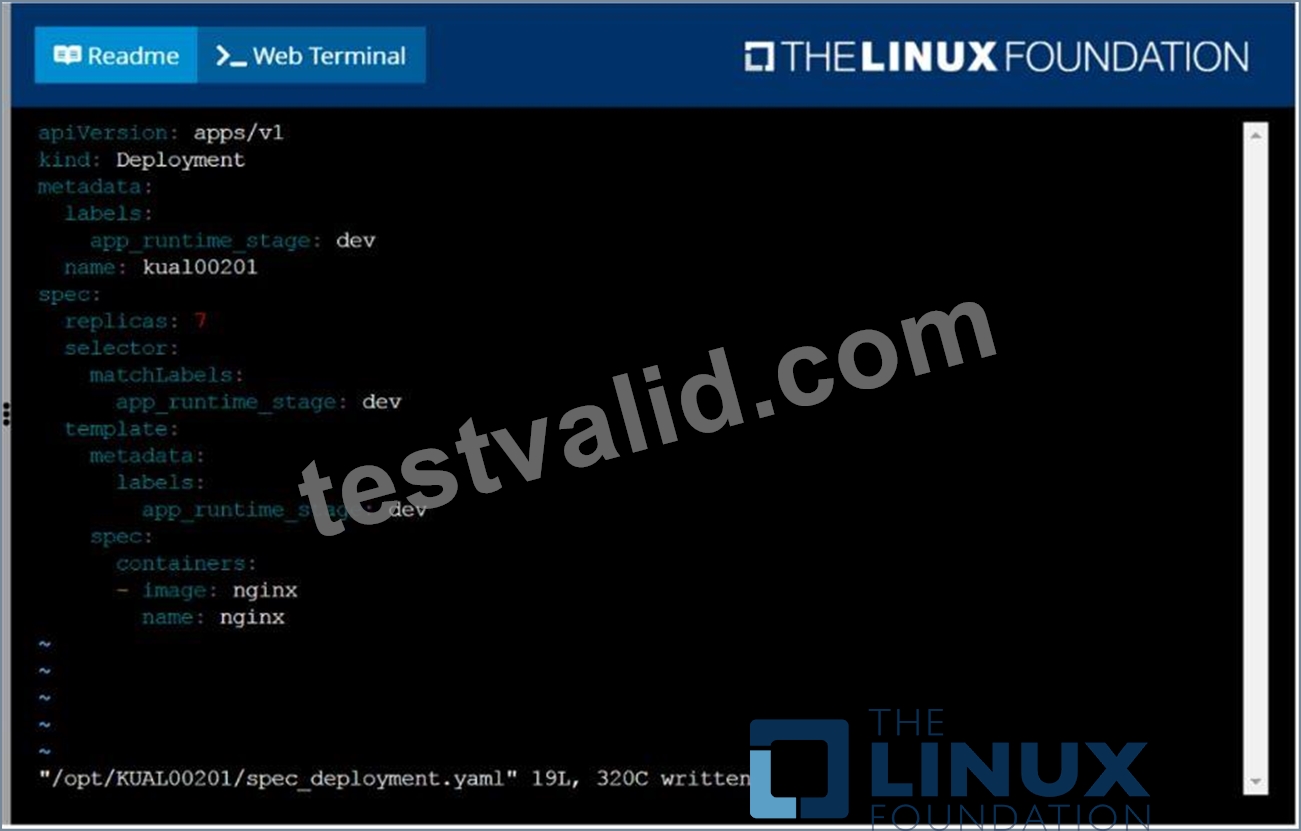
NEW QUESTION # 46
You are managing a Kubernetes cluster with several namespaces. You need to restrict access to the 'production' namespace, ensuring only authorized users can access resources within that namespace. Create a Role and RoleBinding that allows users in the 'developers' group to access pods and deployments within the 'production' namespace.
Answer:
Explanation:
See the solution below with Step by Step Explanation.
Explanation:
Solution (Step by Step) :
Step 1: Create a Role
Create a Role named 'production-access' with the following permissions:
Step 2: Create a RoleBinding Create a RoleBinding named production-developers' that binds the 'production-access' role to the 'developers' group:
Step 3: Verify Verify the role and rolebinding have been created correctly: kubectl get role - -namespace=production kubectl get rolebinding - -namespace=production
NEW QUESTION # 47
Monitor the logs of pod foo and:
* Extract log lines corresponding unable-to-access-website
* Write them to/opt/KULM00201/foo
Answer:
Explanation:
See the solution below.
Explanation
solution

NEW QUESTION # 48
Get IP address of the pod - "nginx-dev"
Answer:
Explanation:
See the solution below.
Explanation
Kubect1 get po -o wide
Using JsonPath
kubect1 get pods -o=jsonpath='{range
items[*]}{.metadata.name}{"\t"}{.status.podIP}{"\n"}{end}'
NEW QUESTION # 49
Get list of all the pods showing name and namespace with a jsonpath expression.
Answer:
Explanation:
See the solution below.
Explanation
kubectl get pods -o=jsonpath="{.items[*]['metadata.name'
, 'metadata.namespace']}"
NEW QUESTION # 50
List all the pods showing name and namespace with a json path expression
Answer:
Explanation:
kubectl get pods -o=jsonpath="{.items[*]['metadata.name', 'metadata.namespace']}"
NEW QUESTION # 51
Score:7%
Task
Create a new PersistentVolumeClaim
* Name: pv-volume
* Class: csi-hostpath-sc
* Capacity: 10Mi
Create a new Pod which mounts the PersistentVolumeClaim as a volume:
* Name: web-server
* Image: nginx
* Mount path: /usr/share/nginx/html
Configure the new Pod to have ReadWriteOnce access on the volume.
Finally, using kubectl edit or kubectl patch expand the PersistentVolumeClaim to a capacity of 70Mi and record that change.
Answer:
Explanation:
Solution:
vi pvc.yaml
storageclass pvc
apiVersion: v1
kind: PersistentVolumeClaim
metadata:
name: pv-volume
spec:
accessModes:
- ReadWriteOnce
volumeMode: Filesystem
resources:
requests:
storage: 10Mi
storageClassName: csi-hostpath-sc
# vi pod-pvc.yaml
apiVersion: v1
kind: Pod
metadata:
name: web-server
spec:
containers:
- name: web-server
image: nginx
volumeMounts:
- mountPath: "/usr/share/nginx/html"
name: my-volume
volumes:
- name: my-volume
persistentVolumeClaim:
claimName: pv-volume
# craete
kubectl create -f pod-pvc.yaml
#edit
kubectl edit pvc pv-volume --record
NEW QUESTION # 52
List pod logs named "frontend" and search for the pattern "started" and write it to a file "/opt/error-logs"
Answer:
Explanation:
Kubectl logs frontend | grep -i "started" > /opt/error-logs
NEW QUESTION # 53
Create and configure the service front-end-service so it's accessible through NodePort and routes to the existing pod named front-end.
Answer:
Explanation:
NEW QUESTION # 54
Create a persistent volume with name app-data, of capacity 2Gi and access mode ReadWriteMany. The type of volume is hostPath and its location is /srv/app-data.
Answer:
Explanation:
Persistent Volume
A persistent volume is a piece of storage in a Kubernetes cluster. PersistentVolumes are a cluster-level resource like nodes, which don't belong to any namespace. It is provisioned by the administrator and has a particular file size. This way, a developer deploying their app on Kubernetes need not know the underlying infrastructure. When the developer needs a certain amount of persistent storage for their application, the system administrator configures the cluster so that they consume the PersistentVolume provisioned in an easy way.
Creating Persistent Volume
kind: PersistentVolume
apiVersion: v1
metadata:
name:app-data
spec:
capacity: # defines the capacity of PV we are creating
storage: 2Gi #the amount of storage we are tying to claim
accessModes: # defines the rights of the volume we are creating
- ReadWriteMany
hostPath:
path: "/srv/app-data" # path to which we are creating the volume
Challenge
* Create a Persistent Volume named app-data, with access mode ReadWriteMany, storage classname shared, 2Gi of storage capacity and the host path /srv/app-data.
2. Save the file and create the persistent volume.
Image for post
3. View the persistent volume.
* Our persistent volume status is available meaning it is available and it has not been mounted yet. This status will change when we mount the persistentVolume to a persistentVolumeClaim.
PersistentVolumeClaim
In a real ecosystem, a system admin will create the PersistentVolume then a developer will create a PersistentVolumeClaim which will be referenced in a pod. A PersistentVolumeClaim is created by specifying the minimum size and the access mode they require from the persistentVolume.
Challenge
* Create a Persistent Volume Claim that requests the Persistent Volume we had created above. The claim should request 2Gi. Ensure that the Persistent Volume Claim has the same storageClassName as the persistentVolume you had previously created.
kind: PersistentVolume
apiVersion: v1
metadata:
name:app-data
spec:
accessModes:
- ReadWriteMany
resources:
requests:
storage: 2Gi
storageClassName: shared
2. Save and create the pvc
njerry191@cloudshell:~ (extreme-clone-2654111)$ kubect1 create -f app-data.yaml persistentvolumeclaim/app-data created
3. View the pvc
Image for post
4. Let's see what has changed in the pv we had initially created.
Image for post
Our status has now changed from available to bound.
5. Create a new pod named myapp with image nginx that will be used to Mount the Persistent Volume Claim with the path /var/app/config.
Mounting a Claim
apiVersion: v1
kind: Pod
metadata:
creationTimestamp: null
name: app-data
spec:
volumes:
- name:congigpvc
persistenVolumeClaim:
claimName: app-data
containers:
- image: nginx
name: app
volumeMounts:
- mountPath: "/srv/app-data "
name: configpvc
NEW QUESTION # 55
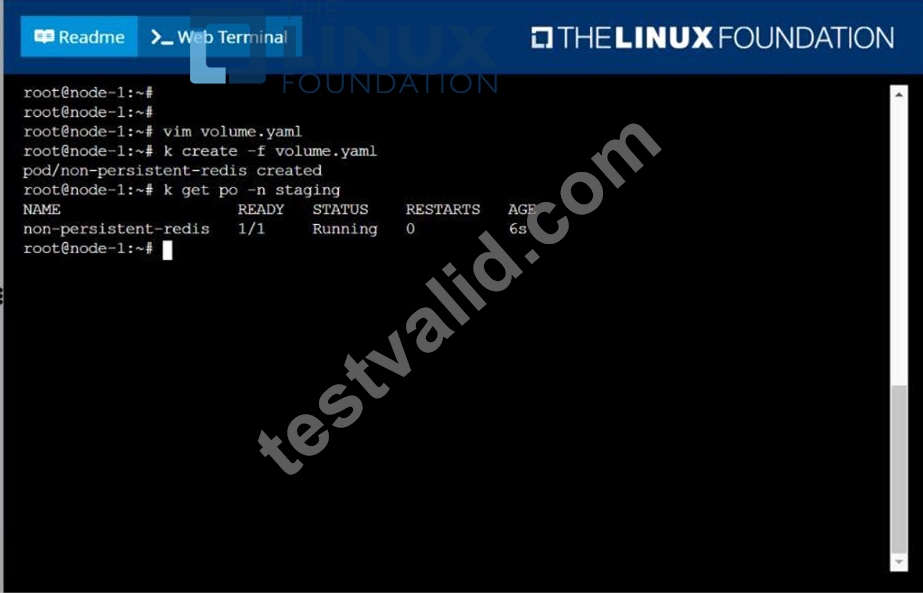
Create a pod as follows:
Name: non-persistent-redis
container Image: redis
Volume with name: cache-control
Mount path: /data/redis
The pod should launch in the staging namespace and the volume must not be persistent.
Answer:
Explanation:
solution

NEW QUESTION # 56
Score: 7%
Task
First, create a snapshot of the existing etcd instance running at https://127.0.0.1:2379, saving the snapshot to /srv/data/etcd-snapshot.db.
Next, restore an existing, previous snapshot located at /var/lib/backup/etcd-snapshot-previo us.db
Answer:
Explanation:
Solution:
#backup
ETCDCTL_API=3 etcdctl --endpoints="https://127.0.0.1:2379" --cacert=/opt/KUIN000601/ca.crt --cert=/opt/KUIN000601/etcd-client.crt --key=/opt/KUIN000601/etcd-client.key snapshot save /etc/data/etcd-snapshot.db
#restore
ETCDCTL_API=3 etcdctl --endpoints="https://127.0.0.1:2379" --cacert=/opt/KUIN000601/ca.crt --cert=/opt/KUIN000601/etcd-client.crt --key=/opt/KUIN000601/etcd-client.key snapshot restore /var/lib/backup/etcd-snapshot-previoys.db
NEW QUESTION # 57
You are running a service that handles requests from multiple pods. How can you scale the service to handle increased traffic without impacting the service availability during the scaling process?
Answer:
Explanation:
See the solution below with Step by Step Explanation.
Explanation:
Solution (Step by Step) :
1. Use a Deployment:
- Deploy the service using a Deployment with the desired number of replicas.
2. Define a Service:
- Create a Service that exposes the application to the outside world.
- Use a 'type: LoadBalancer' to distribute traffic across the pods.
3. Implement Horizontal Pod Autoscaler (HPA):
- Create an HPA that monitors the service's CPU usage.
- Configure the HPA to scale the Deployment based on the CPU utilization.
4. Test the Autoscaling: - Simulate increased traffic to the service. - Observe the HPA scaling the Deployment to meet the demand. 5. Monitor the Service: - Monitor the service's performance and ensure that it remains available and stable during scaling. 6. Adjust HPA Configuration: - Fine-tune the HPA configuration to optimize scaling based on specific performance needs.
NEW QUESTION # 58
List all persistent volumes sorted by capacity, saving the full kubectl output to /opt/KUCC00102/volume_list. Use kubectl 's own functionality for sorting the output, and do not manipulate it any further.
Answer:
Explanation:
solution
NEW QUESTION # 59
......
Linux Foundation CKA: Certified Kubernetes Administrator (CKA) Program is an excellent certification program for individuals who want to enhance their skills and knowledge in Kubernetes administration. The program provides individuals with the necessary skills to manage and administer Kubernetes clusters effectively, ensuring that applications are deployed and maintained efficiently. Certified Kubernetes Administrator (CKA) Program Exam certification is highly regarded in the industry and is recognized globally, making it a valuable asset for individuals looking to enhance their career opportunities.
The CKA exam is challenging and requires a lot of preparation. CKA exam is designed to test the candidate's ability to perform various tasks, including deploying applications, configuring network policies, and troubleshooting cluster issues. CKA exam is conducted using a real-world Kubernetes environment, and the candidate has access to all the necessary tools and resources. To pass the exam, the candidate must score at least 74%, and the exam is valid for three years.
Exam Materials for You to Prepare & Pass CKA Exam: https://pass4sure.testvalid.com/CKA-valid-exam-test.html